Viewing the Model
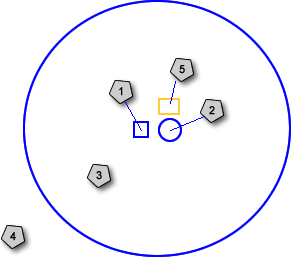
When you first come to the main window in the treatment planning workspace, the text in the lower-left corner shows Camera (Patient View) Navigation. When you point to the image, the camera-navigation controls appear as a large blue circle with a small circle and square in the center of the image.
The idea behind the camera navigation controls is that when using them, you should feel like you are looking through the lens of a camera than move in any direction horizontally and vertically in space 360 degrees around the model, so that you can look down on the model from above, up at the model from below, or straight at the model from any angle.
To Use Camera Navigation:
-
To use camera navigation, point and click anywhere inside the large circle.
Result: The camera navigation controls display. The text in the lower-left corner changes to Camera (Object View) Navigation. -
Point to a control, then press and drag to change the view of the model according to the following illustration.
|
|
|
|
|
To zoom out from the model/image, click inside the square and drag the mouse up. |
|
To zoom into the model/image, click inside the square and drag the mouse down. |
|
|
|
To move the model up/down or right/left, click inside the small circle, and drag the mouse in any direction. |
|
|
To rotate a 3D model in three dimensions from a fixed central axis in the center of the viewing window, click inside the large circle, and drag the mouse in any direction. Imagine that the circle represents a sphere or a globe that you can spin in any direction. |
|
|
To rotate an image/model clockwise or counter-clockwise, click outside the large circle and drag the mouse up/down or right/left. |
|
|
The shading tool allows you to apply a virtual single point of light source on the model to provide shading and a better sense of dimensionality when viewing the model. |


