Performing Manual Tooth Movements
You have the ability to make manual adjustments to individual teeth or multiple teeth at one time. If you are viewing a 3D model in a side window, if you click at tooth. the tooth will be highlighted on the tooth model in the main window as well. There are four options for moving a tooth:
Option 1
Click once on a tooth model. It will turn green and a bounding box will appear around it, with arrows around the bounding box. Click on the arrow pointing in the direction you would like to move the tooth. Notice that the movements you make will be displayed as values on the Displacements tab table.
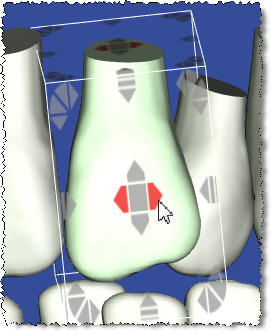
The controls appear as arrows that are color and location coded for the type of movement as follows:
- Mesial/Distal—Red arrows in the center of the bounding box
- Buccal/Lingual—Green arrows in the center of the bounding box
- Occlusal/Gingival—Blue arrows in the center of the bounding box
- Torque Facial/Lingual—Red arrows at the outside edge of the bounding box
- Angulation Mesial/Distal—Green arrows at the outside edge of the bounding box
- Rotation Mesial/Distal—Blue arrows at the outside edge of the bounding box
All outside handles on the bounding box are displayed in front of 3D objects. As you move the tooth, note that the bounding box disappears to avoid obstructing your view.
Note: There are two options for displaying the bounding box controls. The default option displays the controls when you click a tooth. Press the Shift key to hide the controls. You can change this option so that the bounding box controls are only displayed when you shift-click the tooth. To change the current option, click the settings icon and select the Preferences menu. On the Preferences page, click the Appearance tab and then change the Object Navigation with SHIFT option according to your preference by selecting either Yes or No from the drop-down list.
Option 2
Go to the Displacements tab and click in a cell for the tooth and movement you want to display. Use the arrows at the bottom right corner to increase/decrease the values.
Option 3
Go to the Displacements tab and click in the cell for the tooth movement you want to display. Use the controls at the bottom right (the arrows) in the box to increase/decrease the value of a single tooth or range of teeth, then click the = button. Use the + or – buttons to increase/decrease the values for the selected teeth by the amount shown in the box. You can also manually type a value into a cell, and then adjust the value as necessary using the controls previously described.
Option 4
Go to the Displacements tab and click in the box for the tooth and movement you would like to see. Enter a value into the box press the Enter key on your keyboard, or click anywhere on the blue workspace to apply the value you entered.
To move multiple teeth at once:
Go to the Displacements tab and click in the box for the tooth and movement you want displayed. Hold the shift key then click on the last tooth to highlight the teeth to be moved. For example, if you want to extrude UR2-UL2, click in the UR2 Occlusal/Gingival box, hold your shift key, and then click in the Occlusal/Gingival box for the UL2. Enter the amount of movement you want in the box at the bottom right, then click the = button.
Tip: When moving teeth, spaces and intersections will be created and shown in the Mesial Gap/IPR row. To clear these spaces and intersections all at once, click the Clear All Spacings/Inters. button at the bottom of the screen. In SureSmile, spaces are closed mesially and intersections are removed distally.