Using the Treatment Timeline
When you go to a patient overview page, the treatment timeline at the top of the page shows five core events in the patient's SureSmile treatment process. The status of each event is shown under the event.
The treatment timeline is dynamically reconfigured as you treat the patient.
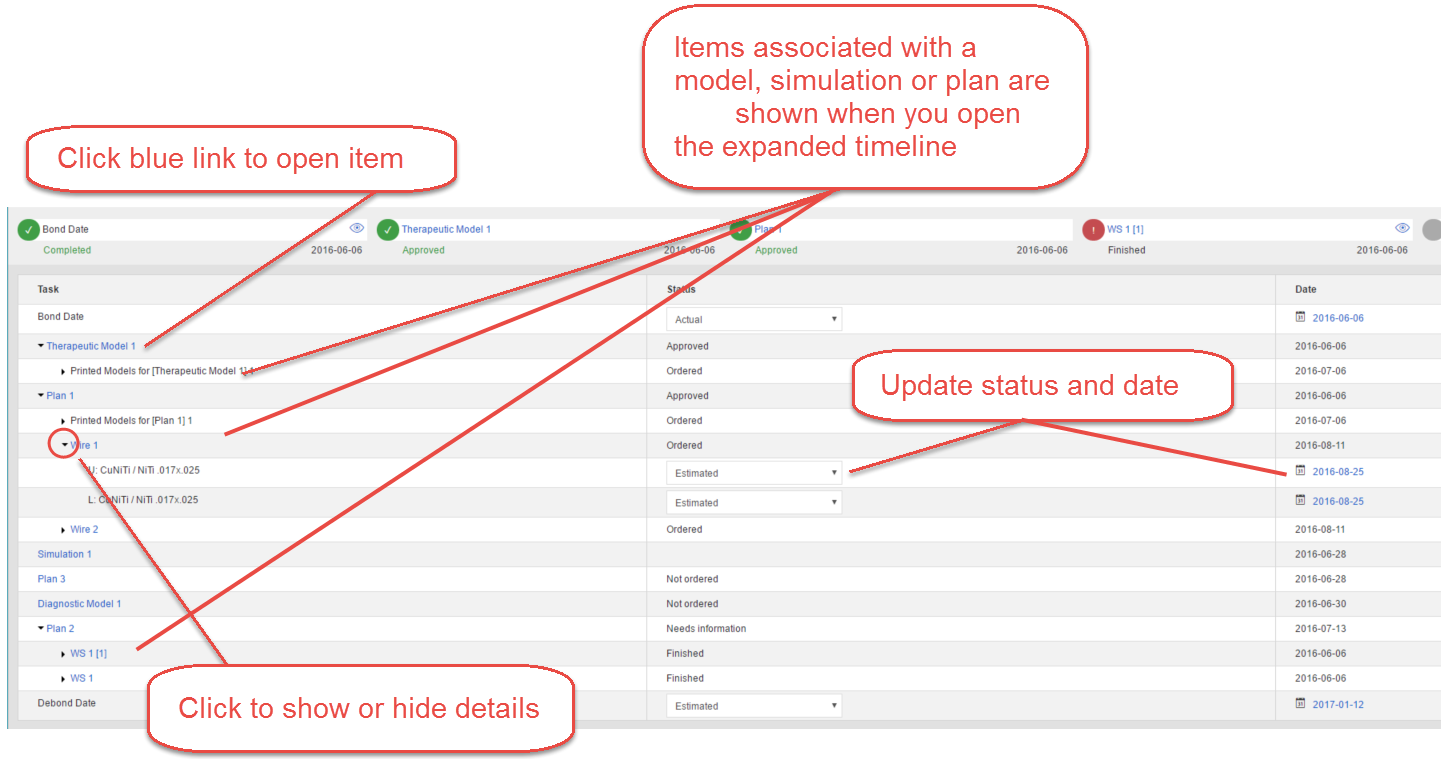
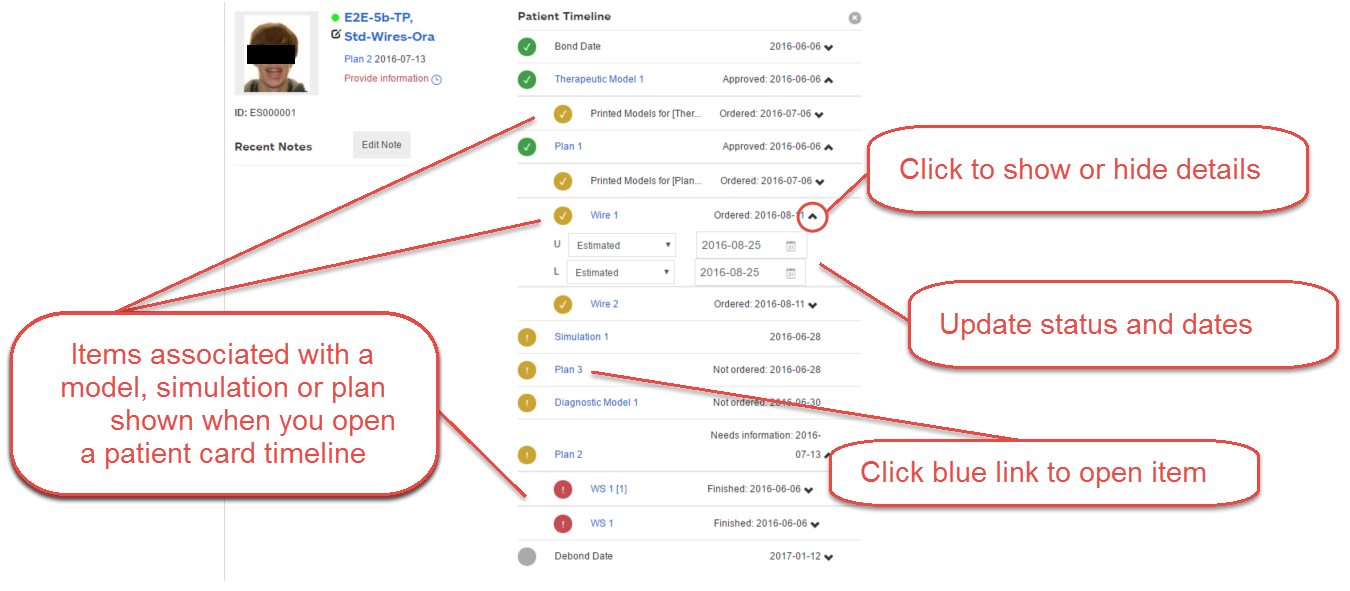
Click the clock icon to the right of the timeline to display a list of all current and past products associated with this patient. Use the drop-down lists in the status column to change the status of tasks. Click on the date links in the Date column to change dates.
Timeline events and products
The following milestones and products are captured by the SureSmile software.
|
Standard Timeline Milestone |
Aligner Timeline Milestones |
|
Bond date |
Therapeutic Scan date |
|
Therapeutic Scan Date |
Setup Approval Date |
|
Setup Approval Date |
Treatment Start (date of appointment when patient receives first set of aligners) |
|
Wire Insertion Date |
Treatment Completion (date of appointment when patient transitioned from treatment to retention). |
| Debond date |
Important! All estimated dates in the timeline are set by your practice, either manually or by setting estimated date parameters under your treatment preferences (see Treatment Time Preferences). Estimated dates are NOT changed or updated by the SureSmile system, the Digital Lab technicians or Dentsply Sirona manufacturing.
Products shown on timelines
These items are shown in the treatment timeline at the top of the Patient Overview workspace. Only the most recent item appears if there is more than one of the same item for a patient:
-
bond date
-
therapeutic models
-
setup model
-
wire orders
-
IDB tray
-
wire (finished and received at practice)
-
upper wire insertion date
-
lower wire insertion date
-
debond date
These items are displayed only if they are used in the case:
-
diagnostic models
-
3D prints
-
final model
-
treatment simulations
Product States
The product states in the timeline are labeled as follows:
- Not Ordered
- Ordered
- On Hold
- Reviewing
- Approved
- Finished
Notes: A wire may also have a state of “Inserted” or “Not used.” Staged models only have a status of Not Ordered or Approved.
Timeline Dates Calculated from Left to Right
After the patient record is initially created, date calculation occurs in a forward direction. When you change a date, all future estimated dates are moved forward or backward by an equal amount. For example...
- If you move the setup approval date forward by one week, the estimated wire insertion date and the estimated debond date are also moved forward a week.
- If you move the estimated, scheduled, or actual scan date, then any future estimated setup approval dates, wire insertion dates, and the debond date are rescheduled.
Note: SureSmile does not automatically change any scheduled dates.
suresmile calculates the estimated wire insertion date for three weeks from the date you ordered the wire instead of from the setup approval date.
Color Coding on the Timeline
On the timeline, the colored circles identify the status of the product or milestone as listed in the table below.
|
Color code |
Description |
|
|
The item is complete. |
|
|
The item is in work but nothing is required of you at this time. |
|
|
The item is in work and you have a task to complete. |
|
|
The item is overdue. |
|
|
The item is not due soon. |


When should you use the timeline features?
- To track the insertion of wires. You can see a separate wire insertion date for upper and lower wires on the timeline so that you can track wires even if only one wire is inserted at the appointment.
- To initiate a new order. If you need to order a product, you can click the New button on the timeline to go immediately to the correct page for placing the order.
- When working with surgical patients. You can see the dates for the post-surgical and pre-surgical models without having to open the patient and then view the patient’s list of products.
- To track patient dates. If you need to postpone a scan appointment date for two weeks, you do not have to manually update the estimated wire insertion and debond dates because estimated dates are automatically calculated from the left to the right after you make a change.
Surgical Cases Denoted on Timeline
If a case involves multi-piece surgery for at least one arch, the post- and Pre-Surgical setups are both labeled and shown.
After you complete the first surgical setup for a case (the post-surgical setup), an <Order setup> task for the pre-surgical setup is added to the Tasks tab. If multiple post-surgical plans are created, the most recently finished plan is shown.
Upper and Lower Wires Shown
Since both wires may not always be inserted during the same appointment, wire orders are shown on the timeline with separate selections for upper and lower wires.
Click the eye symbol in the timeline for a wire order to see the upper and lower wires.
Wire insertion dates are categorized as:
- Estimated
- Scheduled
- Inserted
- Not Used
The dates for the upper and lower wires are synchronized as follows:
| If ... | Then ... |
| You change the date for upper wire insertion ... | The lower wire insertion date is also changed. |
| You change the date for lower wire insertion ... | The upper wire date is unchanged. |
Updating the Treatment Timeline
The treatment timeline is visible on patient cards in the clinic overview and on the patient overview. If you have the list selected, the timeline is not visible on these overview pages.
To update a date and its status in the timeline, follow these steps:
- Choose one of the following:
| If .. | Then .. |
| You are on the clinic overview with patient cards ... |
Click the eye in the upper right corner of the patient card to display the timeline. |
| You are on the patient overview ... | Use the timeline at the top of the page or the full treatment timeline displayed after you click the clock icon. |
- To change a date:
From the expanded timeline on the clinic overview, click the down arrow to the right of the date that you want to change.
OR
From the timeline at the top of the patient overview, click the eye on the right side of the date or product where you want to make the change.
Result: The event or product expands. Some dates have a date and a status menu. - Type over the date in the date field.
OR
Click the calendar icon on the right side of the date field and select the date from the calendar. - To change the status, click the down arrow and select the appropriate value from the drop-down menu.
Note: Changes are saved immediately.
Opening a Product from the Treatment Timeline
To open a product from the timeline, follow these steps:
- Choose one of the following:
If .. Then .. You are on the clinic overview with patient cards ... Click the eye in the upper right corner of the patient card to display the timeline. You are on the patient overview ... Use the timeline at the top of the page or the full treatment timeline displayed after you click the clock icon. - From the treatment timeline, click the name of the product.
Result: You are taken directly to the product in the treatment planning workspace, and you can start working on it.
Note: Some products cannot be directly accessed from the timeline because they are at the Digital Lab or do not yet exist. Names in blue underlined text indicate a product that you can work on.
- Complete your order as usual.
Using timelines to manage staged models, aligners, IDB trays, printed models and wires
If there are IDB trays, staged models, aligners, printed models or wires associated with a digital model, simulation or plan, these are shown when you first open the timeline and remain displayed until you choose to hide them.
Additional detailed information about each item, (i.e., upper and lower wires showing status and dates, or which trays or models are ordered) is initially hidden. Click the small arrow to the right of each item to show or hide additional information.
Aligners
- Aligners can be expanded on the timeline to show a list of individual items in the order, e.g. U (upper) Aligners for [Staged Models 1].
- The series of all aligners included in the order is listed, e.g. L Aligners for [Staged Models 1] 1: 1, 2, 3, 4, 5
3D Prints
- 3D prints denotes physical staged models or physical 3D study models.
- 3D prints can be expanded on the timeline to show a list of individual items in the order, e.g. U (upper) 3D Prints and L (lower) 3D Prints.
- The series of all printed models included in the order is listed, e.g. L 3D Prints: 1, 2, 3, 4, 5
IDB straight wire simulations
- After trays are ordered, the IDB simulation can be expanded to open individual items included in this order, e.g. U Tray and/or L Tray
- The IDB simulation that was used as the base for designing trays will be listed between brackets, e.g., U Printed Tray for [IDB 1] 1
IDB setups (part of Standard w/IDB case package)
- After trays are ordered, the IDB Setup can be expanded to open individual items included in this order, e.g., U Printed Tray and/or L Printed Tray.
- The IDB Setup that is used as the base for designing trays is listed between brackets, e.g., U Printed Tray for [IDB Setup 0] 1.
- Wire 0 can be expanded to list the initial wires included in this order, e.g., U NiTi .016 round
Wires
Wires are at the primary level for ease of access.
Patient Card Timeline
Expanded Timeline on Patient Overview page