Design the Smile Line with the Lip Trace Tool
The lip trace tool allows you to cut out the area inside the lips on a facial smile photo and then superimpose the patient photo over the model to see how much intrusion or extrusion is needed to design the smile line.
Use this tool during the therapeutic model review to get the image ready before you start the setup. You can also use this tool during setup or treatment simulation.
Automatic Lip Tracing
SureSmile automatically draws the lip trace for your Full-service cases.
Lip tracing cuts out the area inside the lips on a facial smile photo and then superimposes the patient photo over the model to see how much intrusion or extrusion is needed to design the smile line. Use this feature during review of the setup and staged models. The lip tracing is automatically applied once the Digital Lab creates the setup. Once the setup has been created by the Digital Lab and sent to you for review, you can view the lip trace cutout on the setup, staged model (if applicable) and the therapeutic model.
To turn on lip trace:
- Open the setup or staged models to be reviewed.
- Click the Display menu.
- Click the Lip Trace tool.
- Click the Fade image control tool.
- Adjust the Fade image control slider as needed.
Additional info:
- You can also view the lip trace on approved setups, staged models, or therapeutic models.
- The automatic lip trace is not applied to the therapeutic model until a submitted setup is in production at the Digital Lab. The automatic lip trace function occurs when the setup is opened in setup design at the Digital Lab only. Since this feature is only applied when the setup is processed, it is not available in a treatment simulation.
- The practice may utilize this feature when reviewing the patient’s setup or aligners. The automatic lip trace feature can be viewed in the approved therapeutic model and a previously created treatment simulation only after a setup or aligners are in a To Review or Approved State.
- If the practice wants to view the Lip trace feature in the therapeutic model or in a treatment simulation without a setup or staged models in a review state, they have to apply the lip trace manually using the lip trace tools.
Manual Lip Tracing
Slide Show: Here are step-by-step instructions for manually using the lip trace tool with a therapeutic model.
How to use slideshowHow to use slideshow
To use the lip trace tools:
- Open the model or treatment simulation you want to work with. Make sure the smile photo from the correct image set on which you want to perform the lip trace cutout is displayed in one of the side windows. How do I do this?How do I do this? Click in the side window to make it active. (Yellow frame indicates window is active.)
- Click the Open Image Chooser button in the top or bottom side window where you want to display the smile photo.

- The Image Selection dialog box opens. Make sure the correct image set is selected by clicking the Image Set drop-down list arrow. If the correct image set is not already select, select the correct one now.
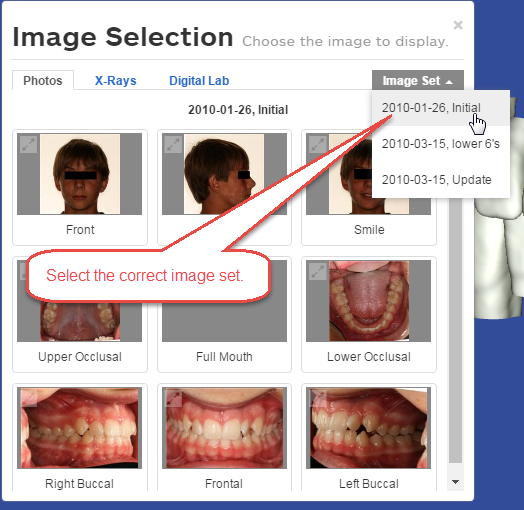
- Once the correct image set is displayed in the Image Selection dialog box, click on the thumbnail of the photo you want to display in the side window of the treatment planning workspace. This will cause the Image Selection dialog box to close and the photo you clicked on will appear in the side window.
- Click the Image menu to display the image tools, and click the Lip Trace Tools
 icon.
icon. - In the menu bar, click Display. Toggle the tools as listed and shown below:
- Click the Open Image Chooser button in the top or bottom side window where you want to display the smile photo.
| Click Display Menu tools.... | ...to show |
| Maxilla and Mandible | both arches in main window |
| Toggle Active /Reference Model | Active or Reference Model in main window |
| Gingiva | Gingiva for more lifelike appearance |
| Smile Photo | Smile photo in main window |
Manually treating a lip trace cutout on a linked facial smile photo:
- Click the Image menu in the treatment planning workspace or in the menu bar on the Image Management page and then click the Lip Trace Tools icon. The software checks for a linked model. If the photo shown is linked to a model, the lip trace control panel appears to the left of the photo. Note the name of the linked model is shown.

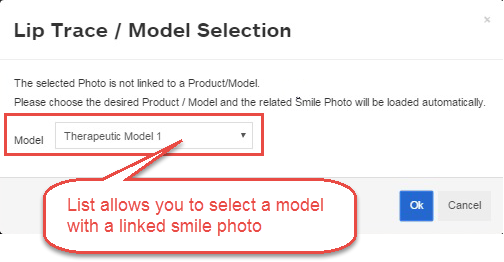
- If there is one model with a linked smile photo other than the one shown, then the smile photo linked to that model replaces the photo on the image management page and the lip tracing tools are activated.
- If there are multiple models with linked smile photos other than the smile photo shown, the software displays a message box with the option to choose one of the models with a linked smile photo. If you select one of the models in the list, the smile photo linked to that model replaces the photo shown and the lip tracing tools are activated.
-
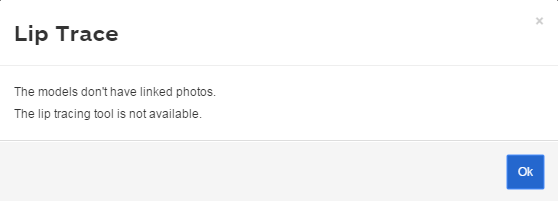
- If there are no models with linked images, the software displays a message indicating this and stating that the lip tracing tool is not available. If you want to link an image with a model, do one of the following
-
- If the therapeutic or setup model is in a review status, in the Edit Notes text box on the Order tab add a note which photo should be linked to the model, and submit the model with modifications.
- If the therapeutic or setup model is already approved, please contact SureSmile Customer Care. Be prepared to tell them which image set the smile photo belongs to and which model you want linked.
- For treatment simulations, please contact Customer Care. Be prepared to tell them which image set the smile photo belongs to and which reference model you want linked.
-
If the smile photo is linked to a model and the Lip Trace control panel is available, then you are ready to begin the lip trace. Click one of the three buttons as appropriate on the Lip Trace Control panel:
- Add Lip Trace - Use this tool to draw the lip trace cutout or add cutout areas to a lip trace cutout. Click and drag your mouse to trace the lip line. Your cursor turns into a cross-hair X to help your accuracy.
- Subtract Lip Trace - Move the mouse to erase a portion of the lip trace. Useful when you are fine-tuning a lip trace cut out.
- Delete Lip Trace - Completely removes the lip trace. Use when you want to remove the lip trace and start over.
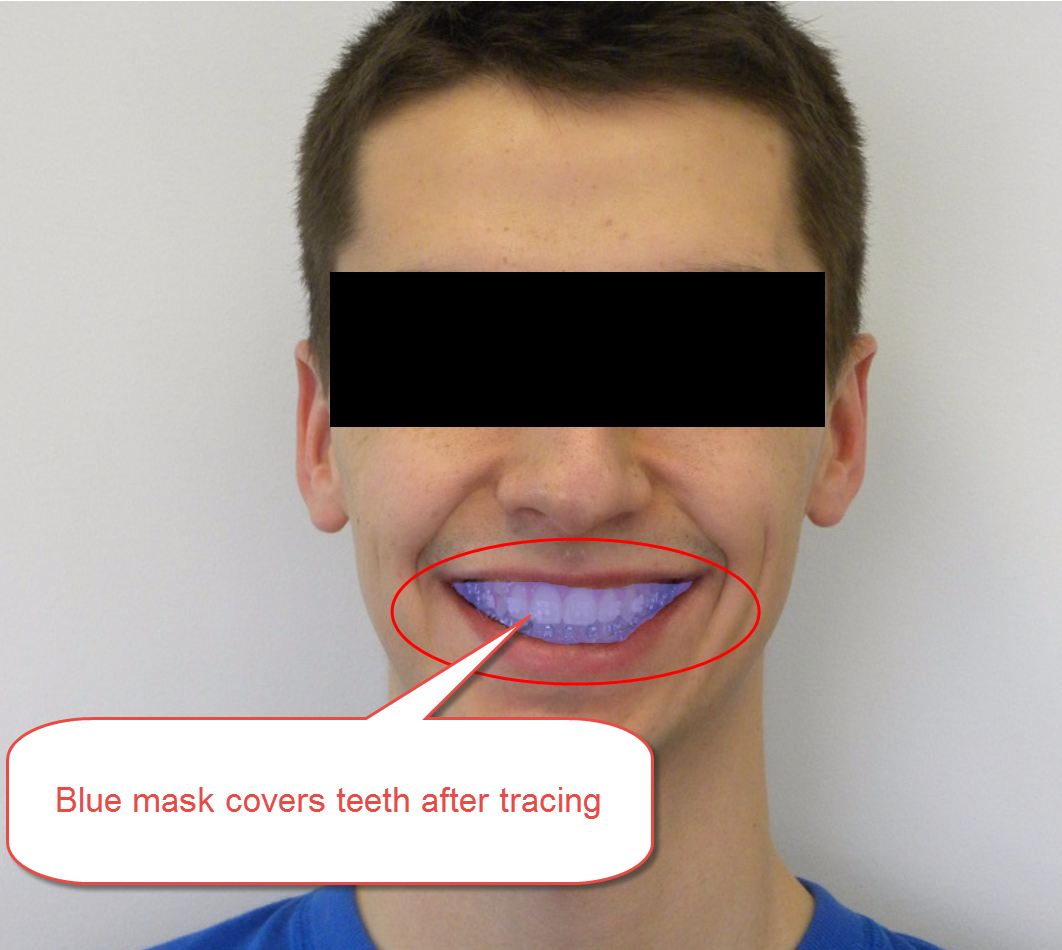
Result: After you complete a trace, a blue mask covers the teeth in the photograph.
The teeth in the smile photograph in the main window are simultaneously cut out so that the model behind the photo shows through.
View the Lip Trace Cutout
Follow the steps below to overlay the facial smile photograph on top of the 3D model in the main window so that the teeth of the model appear in the cut out area of the photo.
- Open the model you wish to view with the smile photo superimposed.
- Click the checklist icon and select the Facial Smile step.
- Make sure the facial smile photograph with the cutout is displayed in the main window or in one of the side windows.
- In the menu bar, click Display. Toggle the tools as listed and shown below:
| Click Display Menu tools.... | ...to show |
| Active | Active model in main window |
| Toggle Active /Reference Model | Active or Reference Model in main window |
| Gingiva | Gingiva for more lifelike appearance |
| Smile Photo | Smile Photo in Main window |
| Fade | Fade Image slider control - adjust transparency of photo |
| Lip Trace | Lip trace on or off |
| 3D/2D | Linked smile photo on or off |
-
When finished, click the next step in the checklist to continue your review.
How to subtract or add to lip trace area
- Click the image in the top right panel and use the zoom controls to enlarge the patient’s smile.
- Click the Image menu.
- Click the Lip Trace Tools icon to display the tools.
- Click Add, Subtract or Delete and make your changes.
- Click to highlight the large 3D window.
- Click the Display menu.
- Click the Lip Trace icon.
- Your changes will be shown in the large 3D window and will be visible in the patient’s therapeutic model, treatment plan, staged models or simulation.