(non) Case Type Step 4 - Generate the staged model sequence
- Go to the Order tab of the treatment simulation you just created. Click the Create Staged Model Sequence... button.

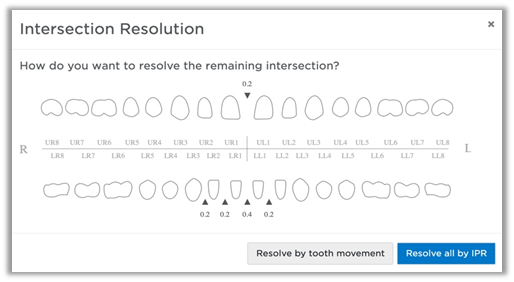
- If there are intersections in the simulation the Intersection Resolution box will display. If you want to resolve the intersections with IPR, click Resolve all by IPR to continue. If you want to remove the intersections in the simulation click Resolve by tooth movement to adjust the simulation.
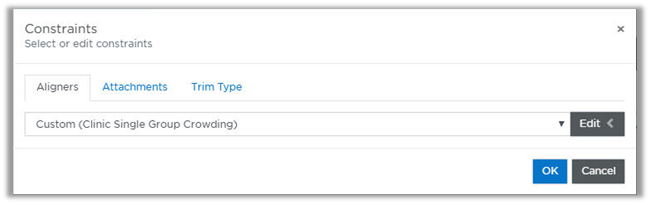
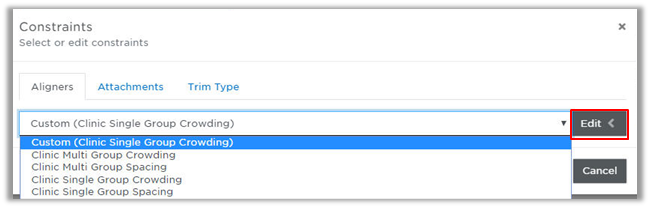
- The Constraints window opens. Choose the constraint set from the drop-down menu. If needed, click Edit to edit the constraints for this patient.
- Click OK.
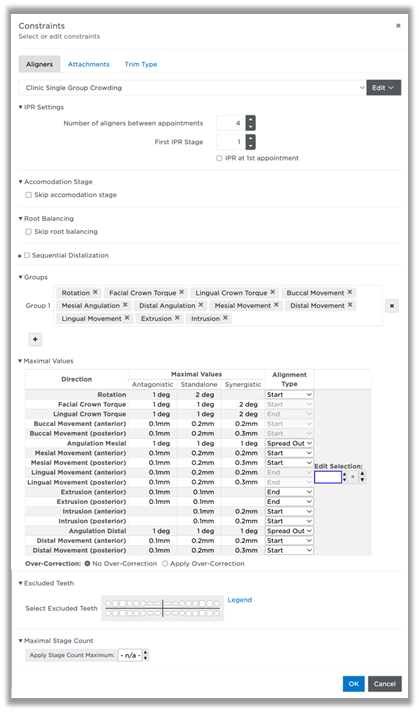
IPR Settings
Use the Aligner Constraints preferences to indicate the number of Aligners to be worn by the patient between appointments and/or the first stage where IPR should be applied.
Select the IPR at 1st appointment option to calculate all IPR before the first Aligner. Leave this option unchecked to allow SureSmile® to determine when it is optimal to apply the IPR.
Accommodation Stage
The accommodation stage is the first stage in the staged model sequence and is automatically generated with minimal movements to ease the patient into treatment. The Skip accommodation stage check box allows you to skip this accommodation stage in the staged model sequence.
Root Balancing
Root balancing will automatically be applied unless you check the checkbox to skip root balancing. Root balancing will balance the torque and labial/lingual movements so that both directions are realized with the same number of stages.
Sequential Distalization
Sequential Distalization is a method to move posterior teeth one tooth at a time in a controlled manner without loss of anchorage. The benefit of this is you are able to create space for front teeth movement without causing flaring to achieve a more aesthetic smile and functional bite.
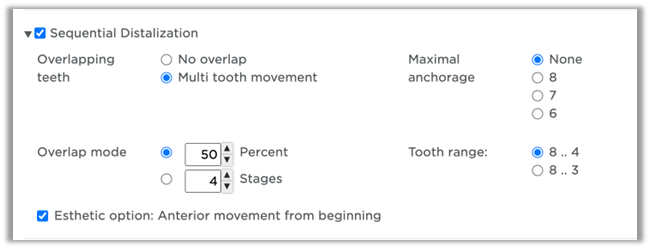
Overlapping teeth: how many teeth may distalize at the same time
- No overlap: one tooth distalizes at a time
- Multi teeth: teeth may distalize according to the overlap mode even if more than two teeth are being distalized
Overlap mode: Defines the start of distalization of the next mesial tooth. It can be defined as percentage of distalization movement or in number of stages. How many teeth move in the selected overlap mode depends on the max anchorage selection. If none is selected, then all teeth of the selected tooth range move according to the overlap mode.
Maximal anchorage: Allows for None, 8, 7 and 6.
6 means that the first molar and all distal teeth would move one at a time until final distal position is achieved. The overlap mode consequently only affects the bicuspids and the canine, depending on the tooth range selection.
Tooth range: Defines the group of teeth which will be affected by sequential distalization.
Esthetic option: Anterior movement from beginning: The range of teeth is defined by the tooth range of distalization and can be 2-2 or 3-3. When checked, the anterior teeth start beginning with stage 1 with opening movements and all movements which do not have a lingual or distal effect, such as buccal, rotation, mesial, labial torque, intrusion or extrusion.
All other movements (distal, distal angulation, lingual, lingual torque) wait until the distalization group has achieved its final distal position.
If the esthetic option is not selected, the anterior group will not move until the distalization group has achieved its final distal position.
Maximal Values
Change the maximal values as needed.
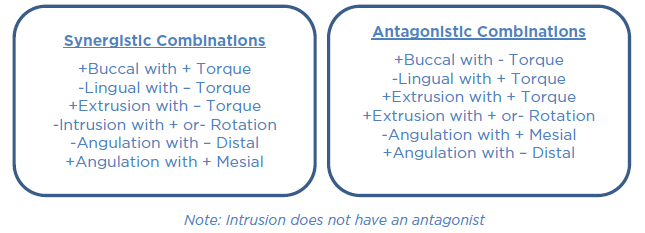
- Antagonistic movement rate – when a combination of movements slows down the typical tooth progress as expected with standalone movement.
- Standalone movement rate – the movement rate expected when the tooth moves independently of antagonistic or synergistic combinations. Standalone movement is the default preference for all teeth.
- Synergistic movement rate – when the combination of movements improves the typical tooth progress compared to standalone staging.
Alignment Type
Choose where the movement is placed in the sequence: Start, Spread Out or End.
Note: Root balancing overrides this feature; you may need to skip root balancing to change the sequence of certain movements.
Overcorrection
Choose whether to apply over-correction stages for this patient.
Note: Over-correction settings are in Preferences.
Excluded Teeth
Select Excluded or Fixed teeth here. Click once to exclude a tooth, click twice to mark a tooth as fixed.
- Exclude: When a tooth requires a large amount of correction (e.g., a very large rotation correction), you can exclude this tooth from staging to avoid increasing the total number of stages.
- Fixed: Movements made to selected tooth will be removed from staging and placed in the last stage
Maximal Stage Count
Choose a maximal stage count if needed. The movements in your simulation will be spread out among the number of stages chosen. Please note that this may override the Aligner constraints and allow more movement per stage depending on the movements needed and the number of Aligners selected.
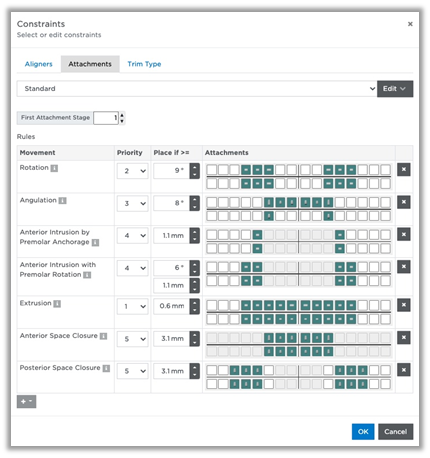
Automatic Attachment Placement
From the drop-down menu select the Standard attachment set to apply attachments automatically or choose No Automatic Attachment Placement to skip automatic attachment placement.
To edit the Standard set for this patient, click Edit.

Indicate the first stage in which attachments should be applied and modify the attachment settings for this patient as needed. Change the priority for each movement under Priority. Change the thresholds for which attachments are placed under Place if >=.
Change, add or remove an attachment by clicking on the tooth in the tooth chart and selecting a new attachment from the pop-up menu.
Note: You can change or add attachments manually in the staged model sequence.