Manage Image Sets
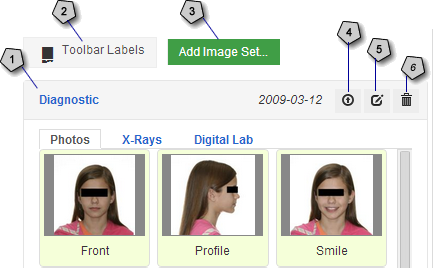
The right panel in the image editor allows you to add and view images. Shown below is the top part of that panel:
|
|||
 |
Name of image set. Date of image set is in italics to the right. Click to expand or collapse view of images in the set. |  |
Upload images icon |
 |
Toggle the toolbar labels in the left panel on and off. |  |
Edit image set icon |
 |
Use this button to add a new image set from this page. |  |
Trash can icon to remove the selected image set. |
Create a new image set
- On the patient overview, click Image Sets and then select Add Image Set...
OR
In the image editor, click the green button at the top of the panel on the right side of the page.
Result: The New Image Set page opens. - Enter the name for the image set.
- If you need to change the date, type the date or click the calendar icon and select the date that the records were taken.
- Click Save.
Change the image-set name and date
To change the name and/or date of an image set, follow these steps:
- From the patient overview, click Image Sets and then select the image set for which you want to change the name or date.
- Click the edit button to the right of the image set name.
- Click the edit icon
 ,
and select the name of the set that you want to change.
,
and select the name of the set that you want to change. - Change the name and/or date.
- Click Save.
Add images to the image set
When you click edit for an image set on the patient overview, you go to the image set page, which has a large pane on the left for viewing an image and a pane on the right for adding and showing images.
The pane on the right has three tabs:
- Photos where you can add nine pre-labeled images plus 15 additional photos.
- X-Rays where you can add six pre-labeled images plus 15 additional x-rays.
- Digital Lab where nine images can be added by the Digital Lab.
To add images to an image set, follow these steps:
- From the patient overview, click Image Sets and then select the image set into which you want to add photos or x-rays.
- Click the Edit button to the right of the image set name.
Result: The image set page opens. - On the right pane of the screen, click the appropriate tab for the images you want to add: Photos or X-Rays.
- Click the upload icon
 on the thumbnail view that you want to add.
Result: The New Image box opens. - Enter a title.
Note: The type and image set are default values that you cannot change.
- Click + Add Files...; select
the image from the dialog window, and then click Open.
Result: As soon as you click Open, the image is added to the set in the place that you selected in Step 4. - Repeat steps 4 through 7 until you have added all of the images for this set.
Upload multiple images
To add multiple photos or x-rays at one time, follow these steps:
- Click the Upload Files
button for the image set.
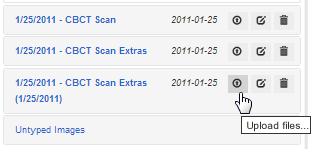
- Select multiple image files from the Open dialog, and click Open.
Result: The selected files appear in the Untyped Images area below the montage. Drag and drop the image into their correct position in the montage.
Move an image in the image set
To move an image to another location in the image set, follow these steps:
- Click and hold down the mouse button on the image that you want to move.
- Drag the image to the new location in the set.
Result: The image in the original location disappears and then appears in the new location. If an image was already in the new location, it exchanges places with the image that you moved.
Delete an image set
- From the patient overview, click Image Sets and then select the image set that you want to remove.
- Click the Edit button to the right of the image set name.
- Click the trash can icon
 to the right of the set that you want to delete.
 - Click OK or Cancel
at the "Are you sure?" prompt.
Result: If you click OK, the image set name disappears from the list.