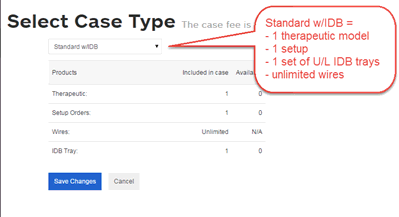
Order a Standard w/IDB Case type
The Standard w/IDB case bundles a set of IDB trays with a standard SureSmile case. This case offers a fast-track workflow for starting your patients in SureSmile:
- You scan the patient, order the initial therapeutic model and provide instructions for a full setup with planned bracket placement, all in a single order.
- SureSmile Digital Lab technicians create the model, setup, place the brackets, design the IDB trays, and return for your review within 10 business days.
- You review the setup, bracket placement and tray designs, and order the initial wire pair with the trays.
- We fabricate and ship the IDB trays and initial wires to you in a single package within 10 business days.
The Standard w/IDB case includes:
- 1 therapeutic model from any scan type
- unlimited update models
- 1 setup
- unlimited wires, including 1 set delivered with the trays
- 1 IDB tray set
Note: Some contracts may also include 1 diagnostic model (from optical scan only)
Here is a comparison of our two IDB products with a standard case:
|
|
IDB Tray Simulation |
Standard w/IDB |
Standard |
|
Base Model: |
diagnostic model |
unbonded therapeutic model |
bonded therapeutic model |
|
Bracket Placement based on: |
treatment simulation |
Setup (created by Digital Lab from doctor’s instructions) |
not included |
|
SureSmile wires |
N/A |
1st set of wires delivered with trays; unlimited additional wires as per plan |
unlimited additional wires as per plan |
|
Customers |
SureSmile, elemetrix |
SureSmile |
SureSmile |
|
Cost (USD – for comparison purposes only) |
$45 (model) + $60 (trays) = $105 |
case price + $60 (trays) |
case price |
Ordering a Standard w/IDB case
![]() To order a Standard w/IDB case that includes a setup, bracket placement simulation, and design of IDB trays all created by our Digital Lab technicians (based on your instructions), along with an initial set of SureSmile wires, follow these steps:
To order a Standard w/IDB case that includes a setup, bracket placement simulation, and design of IDB trays all created by our Digital Lab technicians (based on your instructions), along with an initial set of SureSmile wires, follow these steps:
- From the patient overview page, click Edit.
- From the Patient Profile page, click Change Case Type.
- From the Select Case Type page select Standard w/IDB from the drop-down list and then click Save Changes.
- Click Save on the Patient Profile page to return to the Patient Overview page.
- Take an optical scan of the malocclusion, (i.e., use an orascanner or a third party STL scanner to capture teeth and gingiva). Strongly recommended: scan should be intraoral (plaster models are NOT recommended).
Note: The following procedure is for PLY or STL scan data only. Only STL files from a SureSmile-certified optical scanner (i.e., IOC iTero, 3Shape, CS3500, 3M True Definition) can be uploaded from the SureSmile web browser. For orascanner data files, you must use SureScan. CBCT scans will only be accepted if full supplemental scans from the orascanner or a SureSmile-certified optical scanner are also included with the order. CBCT scans with supplemental scans must be ordered from SureScan. If you attempt to order a therapeutic model for a Standard w/IDB case without a supplemental scan, the Submit button will be unavailable until you provide supplemental optical scan data. For more information see Ordering a therapeutic model from SureScan for a Standard w/IDB case in the SureScan online help.
Ordering the therapeutic model from SureSmile
-
Click the New button and then click Therapeutic Model. The Order page opens.
Note: If you are working with a Standard w/IDB case and you have already ordered a therapeutic model for this case, a dollar sign ($) appears to the right of the Therapeutic Model option in the New menu. This indicates that there is a fee associated with any additional therapeutic models ordered beyond the one model included in the standard case.
-
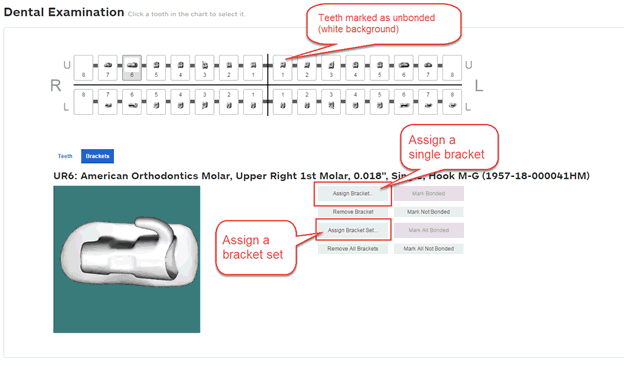
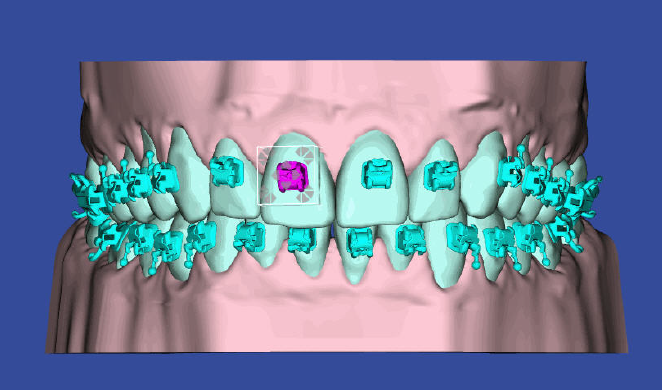
On the Order page under the Dental Examination, click the Brackets tab and assign brackets, as a set or individually. Brackets must be IDB approved, as indicated in the description in the Bracket Selection or Bracket Set/Attachments Selection dialog boxes. Note even though the brackets have been assigned, the teeth are marked as unbonded in the tooth chart.
Tip: To quickly determine if a bracket is IDB approved, hover your mouse over the bracket in the tooth chart to display a pop-up box with details about the bracket.
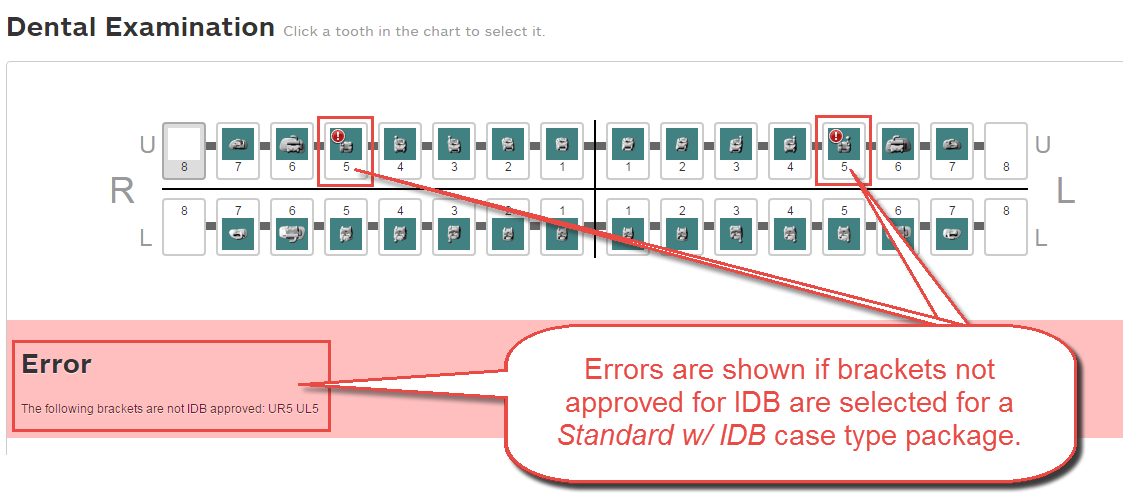
Automatic Error Detection
Before you can submit the therapeutic model, SureSmile checks the selected brackets to make sure that all brackets are IDB approved. If any brackets are found that are not IDB approved, SureSmile marks each non-IDB approved bracket with a red exclamation mark, and an error message appears as shown. You cannot submit the therapeutic model until you replace brackets with IDB-approved brackets.
-
Fill out the prescription area. As you make changes or click in each section of the form, each letter of the MACROS progress indicator is shaded dark blue. All letters except for the S must be shaded blue before you can submit your order.
Tip: If you don’t need to change a section of the form, just click a letter in the MACROS progress indicator to turn on the shading and mark that section complete.
-
Under Upload your photos and x-rays click Browse to find and upload the images for the patient. You can upload one image or upload the entire image set all at once. You can also drag and drop photos between image slots, and you can re-import photos at any time.
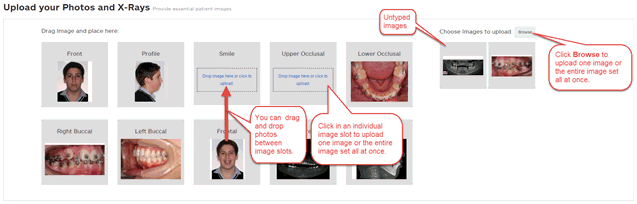
After you upload images the system assigns the image set the name: "Initial Image Set" + the date the images are initially uploaded.
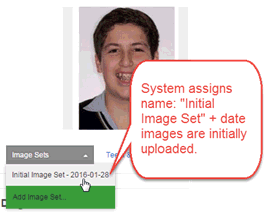
Note: This is NOT the date the images are taken but the date they are uploaded into SureSmile or SureScan.
Delete photos by hovering over an image and clicking the small trash can icon.

-
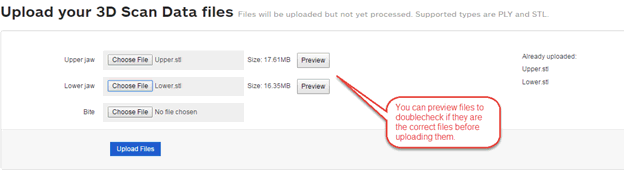
Under Upload your 3D Scan Data files, click Choose File to browse and open each file for: Upper Jaw, Lower Jaw and (optional) Bite. Once you have chosen all of the files, click Upload Files.
-
Under Submit Order, add notes if needed in the Order Notes text box and then click Submit Product.
Reviewing your IDB Setup
-
After you submit the product, check your tasks list for the completed IDB setup to come back to you for your review. Allow 10 business days for the setup to be processed and returned to you. Click the IDB Setup link on the timeline to open the IDB workspace and begin your review.
-
Click each of the steps in order and make modifications as needed.
-
When you click the Select Initial Wires step, the Wire tab is selected and the wire design workspace opens with the reference model (therapeutic model with blue teeth) displayed in the left pane and the current (i.e., the active plan displayed with white teeth) in the right pane. Select the wire cross-section and materials you want and enter any wire overrides needed.
-
Click last step, Order Trays and Initial Wires. The Order tab opens.
-
Click Approve Setup and Submit Order (Trays & Wires) to approve the setup and receive your IDB trays and wires. Please plan a minimum of 10 business days to receive your shipment of the trays and wires for the patient in a single kit.
or
Click More to approve only the setup or to create a staged model sequence.
If you wish, the Approve Setup (IDB not needed) option under the More button on the Order tab also allows you to continue with SureSmile wires without having to order IDB trays or without having to start a new standard case.
There are two scenarios where it makes sense to choose this option:
-
Scenario A - You’ve already exported the IDB tray digital files for printing in-house or at a 3rd party lab and you no longer need to order printed trays from Dentsply Sirona. In this scenario, after you select the Approve Setup (IDB not needed) option, you can now continue with designing and ordering SureSmile wires.
-
Scenario B - You decide not to use IDB at all but instead bond the patient directly. In this scenario, after you select the Approve Setup (IDB not needed) option, you will first need to submit a bracket update scan of the directly bonded brackets to reflect the actual bracket positions. You can then continue with designing and ordering your SureSmile wires.
-
If you clicked Approve Setup, the Approve Setup dialog box opens. Review your order one last time, and then click Approve.
Adjusting Bracket Placement
To make adjustments to the brackets, click the bracket in the 3D window to activate the navigation controls, then click the arrows on the bounding box to adjust the bracket position.
You can also adjust bracket positions using the cells in the Bracket Placement tab. See Using the Bracket Placement Tab for more information.
Create Staged Model Sequence button for IDB setups
If you have selected a Standard w/ IDB case and you want to finish the case with aligners, you can reuse the IDB setup for your staged models. Similarly if you are treating the patient with bonded appliances on one arch and aligners on the other arch (combination therapy) you can reuse the IDB setup to create staged models on the single arch.
When you are ready to begin planning aligner therapy, open the patient record and navigate to the IDB Setup. Open the Order tab. Click the Create Staged Model Sequence button under IDB Setup to open the Constraints for Staged Models dialog box.
Set your constraints as needed, then click OK.
The staged models workspace opens with the new staged models simulation. Create your staged models as usual. For more information see Aligner Therapy Treatment Steps - (none) case.